Ein Druckkopf ist die Komponente, die Tinte (oder Toner) auf Papier überträgt und so digitale Dateien in sichtbaren Text und Bilder umwandelt. Bei Tintenstrahlmodellen schießt der Druckkopf mikroskopisch kleine Tröpfchen durch Düsen; bei Lasermodellen übernimmt eine Bildeinheit (Trommel) eine ähnliche Übertragungsfunktion für den Toner, um die sichtbare Seite zu erstellen.

Was ist ein Druckkopf?
Ein Druckkopf ist die Präzisionsbaugruppe, die die Tinte dosiert, positioniert und auf die Seite ausstößt. Er sitzt typischerweise auf einem beweglichen Schlitten, der von links nach rechts über das Papier fährt. Im Inneren öffnen und schließen sich Tausende von Düsen mit hoher Geschwindigkeit, während Heizelemente (thermischer Tintenstrahldrucker) oder Piezokristalle (piezoelektrischer Tintenstrahldrucker) Tröpfchen in Cyan, Magenta, Gelb und Schwarz (und manchmal auch Fotofarben) in exakten Mustern ausstoßen.
Druckkopf vs. Tintenpatrone:
Bei einigen Druckern ist der Druckkopf in die Patrone eingebaut (jede neue Patrone bringt frische Düsen mit).
Bei anderen ist der Druckkopf ein separates, langlebiges Teil, das über Schläuche Tinte aus Tanks oder Patronen erhält.
Laserdrucker verwenden keinen Tintenstrahldruckkopf. Die Bildtrommel und die Entwicklereinheit übertragen und fixieren den Toner. Viele Benutzer bezeichnen diese Baugruppe immer noch vage als „Druckkopf“, es handelt sich jedoch um einen anderen Mechanismus.
So funktioniert ein Druckkopf
Thermo-Tintenstrahldrucker: Ein winziges Heizelement erwärmt die Tinte schnell und bildet eine Dampfblase, die einen Tropfen aus der Düse drückt. Ideal für den Farbdruck zu Hause und im Büro; kann bei Nichtbenutzung leicht verstopfen.
Piezoelektrischer Tintenstrahldrucker: Ein Kristall verbiegt sich unter Spannung und gibt ohne Hitze einen Tropfen ab. Wird häufig in professionellen Foto- und Industriegeräten verwendet und verarbeitet ein breiteres Tintenspektrum (einschließlich Pigmenttinte und Ökolösungsmittel).
Laser-/LED-Systeme: Ein Laser- oder LED-Array schreibt ein elektrostatisches Bild auf eine Trommel. Der Toner haftet an diesem Bild und wird auf das Papier übertragen, bevor er unter Hitzeeinwirkung fixiert wird. Hier gibt es keine Flüssigkeitsdüsen.
Typische Tröpfchengrößen liegen bei Verbraucher-Tintenstrahldruckern zwischen 1 und 12 Picolitern und ermöglichen weiche Farbverläufe und gestochen scharfen Mikrotext.

Arten von Druckköpfen
1) Patronenintegrierte Köpfe
Was es ist: Auf jeder Tintenpatrone befinden sich Düsen.
Vorteile: Einfache Lösung – ersetzen Sie die Kartusche, um neue Düsen zu erhalten.
Nachteile: Höhere laufende Kosten; kleinere Patronen.
2) Feste / langlebige Köpfe
Was es ist: Der Kopf ist permanent; die Tintenzufuhr erfolgt über separate Patronen oder Tanks.
Vorteile: Niedrigere Kosten pro Seite; hervorragende Qualität und Geschwindigkeit.
Nachteile: Erfordert gelegentlich manuelle Pflege; Ersatzköpfe können teuer sein.
3) Thermisch vs. Piezoelektrisch
Thermal: Schnell, erschwinglich, weithin verfügbar.
Piezo: Präzise Tröpfchenkontrolle, breitere Tintenkompatibilität, bevorzugt für professionelle Foto-/Grafikausgabe.
Anzeichen dafür, dass Ihr Druckkopf Aufmerksamkeit benötigt
Horizontale weiße Linien oder Streifen über Bildern/Text
Farben fehlen oder sind verschoben (z. B. kein Cyan)
Der Text sieht unscharf statt gestochen scharf aus
Düsenprüfmuster druckt mit Lücken
Häufige Papierdurchgänge ohne Tintenablagerung
Wenn Sie diese sehen, kümmern Sie sich zuerst um die Druckkopfdüsen.
Wie reinigt man den Druckkopf?
Beginnen Sie mit einer sanften, softwarebasierten Reinigung. Wenn dies nicht funktioniert, wechseln Sie zur manuellen Reinigung. Befolgen Sie, sofern verfügbar, die Anweisungen des Herstellers.
A) Integrierter Reinigungszyklus (schnell und sicher)
Drucken Sie einen Düsentest über das Wartungsmenü Ihres Druckers.
Führen Sie „Head Clean“/„Clean Printhead“ einmal aus.
Warten Sie 5–10 Minuten (die Tinte muss den Schwamm/die Linien erneut sättigen).
Drucken Sie einen weiteren Düsentest.
Wiederholen Sie den Vorgang maximal 2–3 Mal. Wenn weiterhin Lücken bestehen, wechseln Sie zur manuellen Reinigung.
Tipp: Beim Reinigen wird Tinte verbraucht. Vermeiden Sie es, Zyklen öfter als nötig hintereinander auszuführen.
B) Manuelle Reinigung (bei hartnäckigen Verstopfungen)
Verwenden Sie fusselfreie Reinigungsstäbchen, destilliertes Wasser oder eine zugelassene Druckkopfreinigungslösung. Vermeiden Sie Leitungswasser (Mineralien) und vermeiden Sie den Kontakt von Alkohol mit Gummidichtungen, es sei denn, die Marke erlaubt dies ausdrücklich.
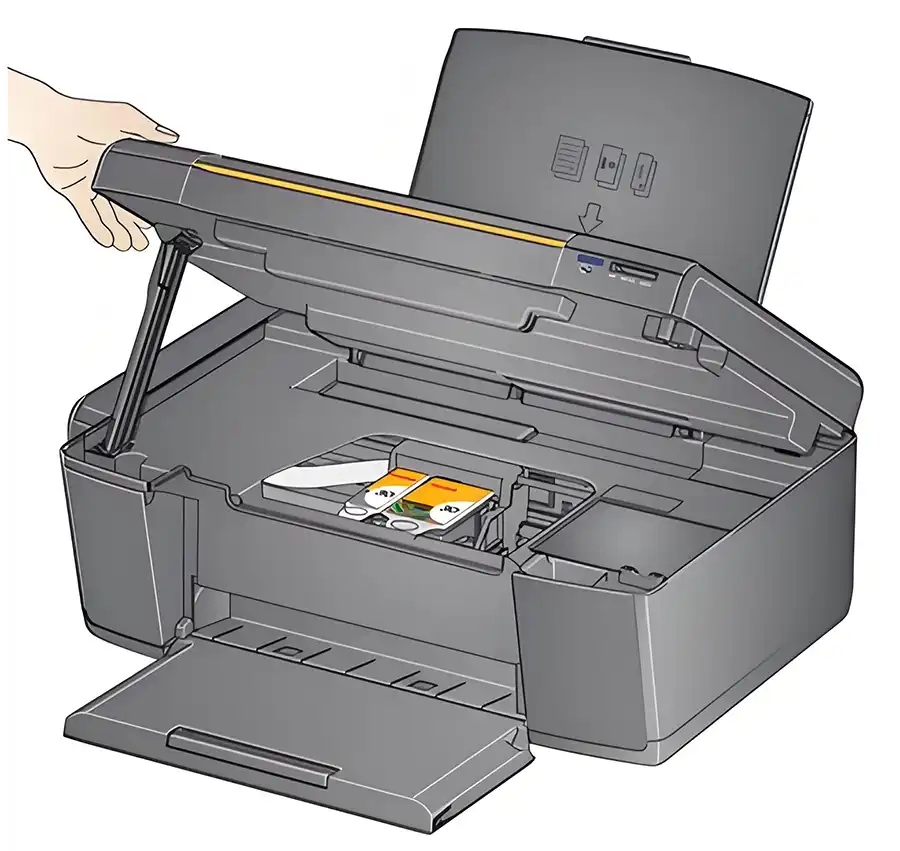
Für Kartuschen-integrierte Köpfe (Düsen auf der Kartusche):
Schalten Sie das Gerät aus und entfernen Sie die Patrone.
Tupfen Sie die Düsenplatte vorsichtig mit einem fusselfreien, feuchten Tuch ab, bis Sie eine saubere, gleichmäßige Tintenübertragung sehen.
Halten Sie die Düsenplatte 1–2 Minuten lang gegen ein warmes, feuchtes Papiertuch, um getrocknete Tinte zu lösen.
Neu installieren, einen einzelnen Reinigungszyklus durchführen und dann eine Düsenprüfung durchführen.
Für feste Köpfe (getrennt von Patronen):
Entfernen Sie die Patronen und parken Sie den Schlitten, wenn der Drucker den Servicemodus unterstützt.
Legen Sie ein fusselfreies Tuch unter den Kopf (sofern zugänglich).
Befeuchten Sie einen Tupfer leicht mit einem zugelassenen Reinigungsmittel und wischen Sie den Düsenbereich vorsichtig ab – nicht kratzen.
Wenn das Modell Einweichen unterstützt: Legen Sie den Kopf so, dass die Düsen 10–30 Minuten lang auf einem mit Reiniger angefeuchteten Pad ruhen.
Bauen Sie die Komponenten neu ein; führen Sie einen Reinigungszyklus und eine Düsenprüfung durch.
Führen Sie eine Druckkopfausrichtung durch, wenn die Textränder ausgefranst aussehen.
Was Sie nicht tun sollten
Verwenden Sie keine scharfen Werkzeuge oder hohen Druck.
Überfluten Sie elektronische Geräte nicht.
Mischen Sie keine beliebigen Chemikalien; verwenden Sie destilliertes Wasser oder eine vom Hersteller zugelassene Lösung.
Wann muss ersetzt werden?
Wenn mehrere Reinigungsrunden und Ausrichtungen fehlschlagen oder elektrische Fehler/Düsenschäden auftreten, kostet ein Ersatzdruckkopf (oder ein Patronensatz) normalerweise weniger als anhaltende Ausfallzeiten und Tintenverschwendung.

So warten Sie Ihren Druckkopf
Drucken Sie jede Woche ein wenig: Hält die Tinte in Bewegung und verhindert trockene Düsen.
Verwenden Sie hochwertige, kompatible Tinte: Schlechte Formulierungen können verstopfen und korrodieren.
Lassen Sie den Drucker normal herunterfahren: Er parkt und verschließt den Kopf, um die Feuchtigkeit abzudichten.
Staub und Feuchtigkeit kontrollieren: Bewahren Sie das Gerät abgedeckt auf; mäßige Luftfeuchtigkeit im Innenbereich (~40–60 %).
Führen Sie vor großen Aufträgen einen Düsentest durch: Erkennen Sie Probleme frühzeitig.
Firmware/Treiber aktualisieren: Wartungsroutinen und Farbsteuerung verbessern sich oft mit der Zeit.
Automatische Wartung aktivieren (falls verfügbar): Einige Modelle führen einen Selbstzyklus durch, um die Köpfe feucht zu halten.
Druckkopf vs. Patrone vs. Trommel
Druckkopf (Tintenstrahl): Düsen, die Tröpfchen abfeuern.
Tintenpatrone/-tank: Der Behälter, der den Druckkopf versorgt.
Bildtrommel (Laser): Der elektrostatische Zylinder, der Toner anzieht und überträgt – keine Flüssigkeitsdüsen.
Fehlerbehebung bei der Schnellkarte
Verblasste oder fehlende Farbe: Düsenprüfung → Reinigungszyklus → Problemfarbe ersetzen → Manuelle Reinigung → Kopf bei Bedarf ersetzen.
Streifenlinien: Zuerst ausrichten, dann reinigen. Überprüfen, ob die Papiereinstellungen mit dem Papiertyp übereinstimmen.
Verschwommener Text: Ausrichtung; Papierpfad auf Feuchtigkeit prüfen; Modus für höherwertiges Papier verwenden.
Häufige Verstopfungen: Erhöhen Sie die Druckfrequenz; wechseln Sie zu höherwertigen oder OEM-Tinten; überprüfen Sie die Luftfeuchtigkeit im Raum.
Der Druckkopf – auch Druckerkopf, Druckkopf oder Tintenstrahldruckkopf genannt – bestimmt, wie scharf, farbenfroh und einheitlich Ihre Ausdrucke aussehen. Machen Sie sich mit dem Typ (thermisch oder Piezo, in die Patrone integriert oder fest) vertraut, achten Sie auf Warnsignale, reinigen Sie ihn sorgfältig und führen Sie einfache Wartungsarbeiten durch. So sichern Sie die Bildqualität, halten die Kosten unter Kontrolle und sorgen dafür, dass Ihr Drucker für alles gerüstet ist.
Häufig gestellte Fragen
-
Wo befindet sich der Druckkopf?
Bei Tintenstrahldruckern befindet sich der Düsenkopf auf dem Schlitten, der seitlich über das Papier gleitet. Bei Systemen mit integrierten Patronen befinden sich die Düsen auf jeder Patrone. Bei Systemen mit festem Kopf verbleibt der Kopf im Schlitten und die Patronen/Tanks befinden sich seitlich davon.
-
Wie lange hält ein Druckkopf?
In die Patrone integrierte Druckköpfe halten die gesamte Lebensdauer der Patrone. Fest eingebaute Druckköpfe können bei richtiger Tinte und wöchentlicher Verwendung jahrelang halten. Bei längerem Nichtgebrauch des Druckers können sie jedoch vorzeitig ausfallen.
-
Ist ein verstopfter Druckkopf dasselbe wie ein niedriger Tintenstand?
Nein. Niedriger Tintenstand zeigt ein gleichmäßiges Verblassen an; Verstopfungen zeigen Lücken oder fehlende Linien bei der Düsenprüfung an.
-
Kann Tinte von Drittanbietern einen Druckkopf beschädigen?
Einige funktionieren einwandfrei, andere verursachen Ablagerungen oder schlechte Benetzung. Wenn Sie wechseln, überwachen Sie die Düsenprüfungen genau und behalten Sie einen Satz OEM-Kartuschen zur Kontrolle.
-
Haben Laserdrucker Druckköpfe?
Nicht im Sinne eines Tintenstrahldruckers. Das Trommel-/Tonersystem übernimmt die Übertragungsfunktion, es gibt jedoch keine Flüssigkeitsdüsen, die verstopfen könnten.